The Final composition, with some reshot footage.
Wednesday, November 24, 2010
Thursday, October 7, 2010
First Test
This is the result of the first shooting, as well as some successes and failures encountered the shoot.
And some pictures of the set.


Creating the set, even though a simple one, took a lot longer than I anticipated. I used black velvet draped onto wooden sticks for support, on top of a foamcore floor. The star background is sequins pinned into the velvet with lights pointed to have them reflect. my goal with this background was to keep the 'stars' out of focus so that the would give a nice halo light effect. Unfortunately because of space limitations I didn't get the depth I wanted, but overall I was satisfied with how they turned out. With some adjustments I can see how I could make this light effect work. I was only using two lights for the entire stage, but on my next shoot I will be setting up four, which should give some vast improvements for both the star lighting and character lighting.
The foamcore board was a great solution to pinning my characters in. I was worried at first on how I would support them, as the pin board is wooden and my characters steps are quite small so I wouldn't have been able to used the fixed holes drilled in them. I considered getting some floral foam, but I was unable to find a supplier close by. I feel like the foamcore was actually a better solution because it is more rigid than foam, and repeatedly poking into the floral foam would eventually destroy its support.
Unfortunately halfway through the shoot my set fell over. I had some problems too in keeping the cloth laid out straight, or I didn't notice my pulling it, so the sequins moved. I can fix this by pinning down the cloth in the back and having better supports for the cloth.
I liked the idea of the camera pan, and although it is quite rough, I did like how it worked out. Stephen has shown me a tripod I can use to get a smooth pan, and for the next shoot I will slow it down and ease out slowly.
These are all technical issues that were just affected by the limitations I had on the set. However, what was more of a concern for me was the lack of success in my characters movement. As I mentioned earlier in this blog, my goal for this project was to translate 3D actions into a physical form. Because of the roughness of my models, the secondary actions I had animated into the templates was not very apparent. Another issue was the point of registration, though using Dragon software was extremely helpful with the onion skin and live feed built into it. I think in order to achieve this goal I want I will have to animate more sophisticated movements and characters to see it. I think printing larger models is also important in order just to assemble the models more accurately. Though the question 'why don't you just do this whole thing in 3D' kept arising in my mind, I still want to persevere with further projects. I think my goal is still achievable.
Character Creation
It has become more important to me lately to create character depth and motivation in all my works that involve a character. I think it became more notable to me after Dylan Brown's talk earlier this year about character creation, particularly when he mentioned that even during technical tests he would always work in a reason for why the character is performing an action.
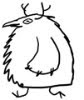
For my Pupurun character, even though this project is more of a technical exploration for me, I attempted to develop some reasoning behind why this character exists and performs as he does.
The first thing I did was write down some basic 'truths' about Pupurun, to develop some limitations to the character.
- Pupurun can physically form into any shape, so long as that shape is whole, one piece.
- Pupurun cannot transform into anything he has not encountered before.
- Pupurun explores his surroundings not by the senses we are familiar with, such as sight, taste, sound, touch or smell; pupurun's only sense is the ability to understand the construction of shapes around him. When another object is in proximity of Pupurun, he is able to mimic the density and arrangement of the object after some consideration. He may not always mimic correctly on the first attempt, particularly if the object is a very complex one.
- Pupurun cannot know the purpose of an object he turns into unless he witnesses how the object functions. Pupurun will often attempt to understand an objects function by exploring his new form. He is curious.
- Pupurun lives out far out in space.


Tuesday, September 28, 2010
Life
This is the test of the walkcycle on 2's, with the closest registration I could get estimating with my hand. I was happy with the turnout, not to mention excited. My little guy (now dubbed the Pupurun, after a Japanese jelly candy) can now walk anywhere! Well, he could, as long as he has the appropriate stands and material to be stuck into. Which is my current dilemma.
Today I spent most of my time speaking with Stephen the studio tech, and Kon, my classmate, figuring out both how to register the models on a surface and how to shoot. The camera room isn't completely set up for shooting 3D puppets yet, but the scene will need more planning in advance anyways. The actual shooting of the scene is really just going to be a one or two day session at most, the extra models of moving my character will be what consumes most of my time.
I've been trying to characterize little Pupurun to understand what would motivate him in the human world. It seems like list making is just a compulsive habit now, so it has already been applied to Pupu.
Amorphous Blob
Pros:
-Can turn into anything within mass, like a small hippo
-Can maneuver in cool ways, like rolling or having many legs
-Can get out of tricky situations
Cons:
-Doesn't have a face, so could never find true love
-Can only mimic, not be
-Is an amorphous blob
I will try making some sort of character out of these observations, and a scene to illustrate at least one of them. I am trying to limit him to mostly walking or possibly a keepalive animation for when he stands still, and be conservative with other actions.
A Return
So as there was an obvious hiatus in this project, its good to return with progress. Joining the experimental animation class has pushed this project into motion again for me, with some actual results instead of just theorizing.
I decided to simplify the form of my model, hoping it would produce an easier template to work with. My result was that I got a template that did remain mostly in one piece (some of the unfolding can end up as many little pieces), though it was still very detailed. I decided I was happy with it and created a 24 frame walkcycle to start with.
Once I was happy with the walkcycle I saved each frame of the cycle into a .obj. These got unfolded and turned into templates, scaled up 20% to fill as much of the cardstock as my home printer could handle. Unfortunately in the first batch my brain decided simple math was just too hard for a simpleton like me, and I scaled some of the models incorrectly. After crossing out all my images and printing on the other side, I got 24 templates to start cutting and forming into figures.


For the cutting and modeling process, I used an exacto knife, glue gun, and my little sister, who has previously made a Master Chief helmet through the same program, and who I was counting on to help me understand this mess of templates. Initially it seemed like a hopeless puzzle, but once I got a sense for the template layout it became almost natural to bend it into the right shape. Initially I wanted to do all 24 of the models, but at the rate I worked at I was averaging at 1-2 hours spent assembling each model. I did only the odd number of frames first, which proved to be a good decision, as I only barely managed to get 12 done within a week (along with my other schoolwork and etc).

Monday, December 21, 2009
T Pose
My model is complete, and the unfold from the t-pose looks straight forward so far. The tougher part for me now will be learning how to rig and animate my character (how grateful I am for online tutorials). I'm concerned about the type of movement I will get but I plan on continuing with 3D lessons in school, so as I (hopefully!) progress in that, I can continue this project along with it.
Here she is:

and her unfold:

I've been thinking about what sort of purpose I have for this project, besides keeping myself occupied... I've wanted to do a puppet animation for some time but I've never felt the patience for dealing with the actual puppet and twisting it to the actions I want it to perform. There are the problems with gravity, and creating that illusion of movement when everything seems to be fighting it back... I want a puppet that I am not contorting, but is custom designed for the moment it is capturing. This is probably already possible, however, my reality is that I am using shareware and have spent 15 dollars so far on cardstock. My budget is pretty limited.
The technical aspect of it is fascinating to me. There are 3D movies I love, but most often with 3D special effects or features I know I am going to be harshly critical of it- it doesn't mesh with the film, it's too smooth, it looks cheap, etc. I think it is the interpolation in the movement that really gets me. I haven't seen a lot of 3D that uses snappy timing, everything is very calculated.... they list along their paths. There is a lot of seemingly erratic factors in real movement, caused by things not noticeable to the naked eye, for example, a table may appear smooth and varnished on first glance, but there is no doubt to be the most minute dips and curves on its surface, and these do have effects. They are tiny but they are there. I don't think these things can be seriously calculated into the animation process, but they can certainly be emulated. With drawn animation I think it is emulated already, naturally, just by the tiny differences that vary from drawing to drawing.
What I am hoping to gain from this project is to be able to utilize that precision and detail from 3D modelling, but to bring it back into an 'imperfect' 2D animation environment. It looks so good in my head right now, I just hope it doesn't stay there.
Saturday, December 19, 2009
Modelling
I'm starting on my model but I'm afraid it might already be a bit complex for making a few papercraft models so testing time:
The model:

The unfold:

Yeah. Already too complicated. Unless I want to spend the rest of my life making paper models.
The model:

The unfold:

Yeah. Already too complicated. Unless I want to spend the rest of my life making paper models.
Subscribe to:
Posts (Atom)